Note: This text is a draft for an article on my blog, to be published when ‘Browser Actions’ is released. I will also publish the second part mentioned below as a draft here, should there be interest.
I am interested in your feedback. Am I being too wordy, should I go into more detail? Is my English not good (I’ve had it proofread by LLMs)? Whatever it is, feedback is welcome! @czottmann hope that’s ok, to use this forum.
0. Introduction
I’m constantly reading, collecting, and evaluating web content, so most of the shortcuts I use are related to interacting with my internet browser. I love tools that help me build workflows on my Mac using Apple Shortcuts. For my workflows, the ‘Actions for Obsidian’ shortcut is invaluable for the collection and evaluation process, and now these workflows can be simplified with ‘Browser Actions’.
Both ‘Actions for Obsidian’ and ‘Browser Actions’ are applications that extend the Shortcuts app with additional actions. The former enhances the capabilities of shortcuts to interact with Obsidian, while the latter provides similar functionality for the interaction across various browsers on the Mac.
I write this post to guide you through the initial steps of using ‘Browser Actions’, helping you familiarize yourself with its features and functionalities. I will provide two simple examples to demonstrate how easy it is to extract information from a website and process it to obtain further insights.
1. Amazon Price history
But first, a note: unfortunately, the Share Sheet on the Mac is not very user-friendly when it comes to shortcuts, as they cannot be accessed directly at the top level. Therefore, I use the Shortcuts menu in the menu bar for all my frequently used shortcuts on the Mac. The downside is that the Shortcuts menu is limited to 16 shortcuts. But lets start!
The web application camelcamelcamel.com tracks how the prices of products on the Amazon website have evolved over time. Because it employs a straightforward URL schema for searching this price history, it’s easy to create a shortcut that can be invoked directly from a product page, rather than having to copy and paste or switch browser tabs manually.
To achieve this, you need the URL of the product page on Amazon and append it to the following URL:
https://camelcamelcamel.com/search?sq=AmazonURL
Using standard Apple Shortcut actions, you can create a workflow with the following steps:
- Get the URL from the current browser using the “Receive URLs input fromWhats On Screen” action.
- If there is no URL, stop the workflow with the message “No URL.”
- Check if the URL contains the word ‘amazon.’
- If it does not, stop the shortcut with the message “No Amazon URL.”
- If it does, concatenate the URL with the CamelCamelCamel URL.
- Open the resulting URL using the “Open URL” action.
And this is the shortcut:
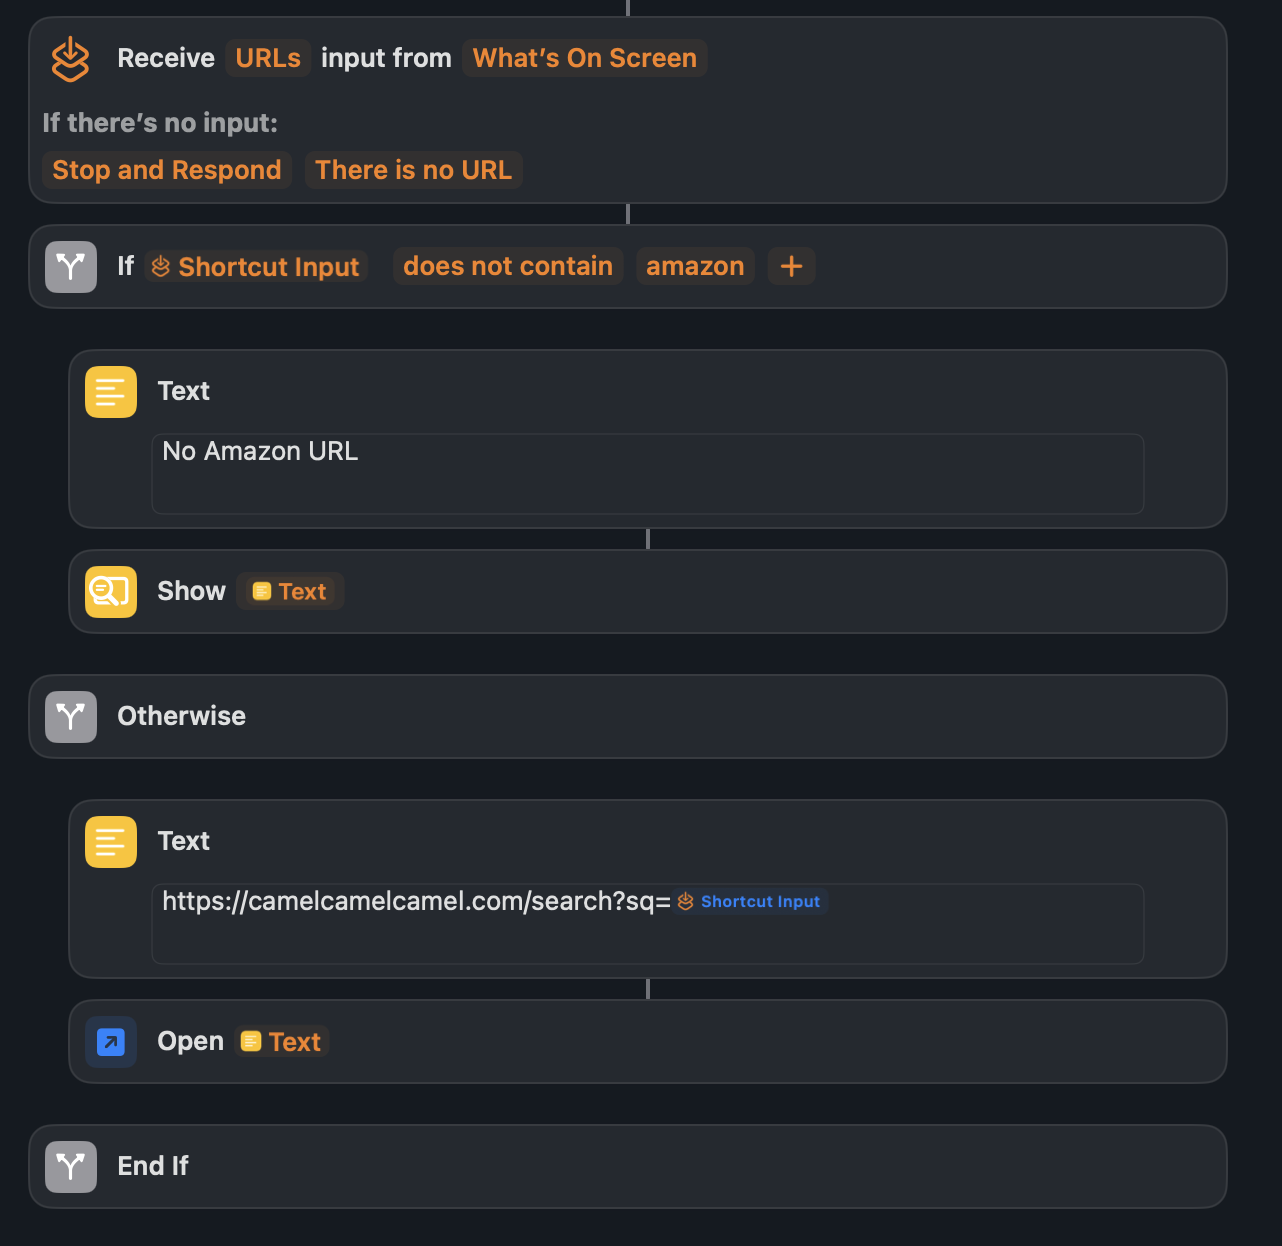
This works as expected when you call the shortcut from the Safari browser. However, if you try this in Chrome or another browser, everything functions correctly, but the Safari browser will open the CamelCamelCamel result page at the end. However, I would prefer if the result were displayed in the same browser from which I initiated the shortcut.
The ‘Browser Actions’ app help to stay within the browser, as it operates based on the concept of the frontmost browser. Even when multiple browsers are open in the background, you can interact with the currently active browser window and expect that the results will be displayed in that same browser.
With ‘Browser Actions’, the shortcut would look like this:
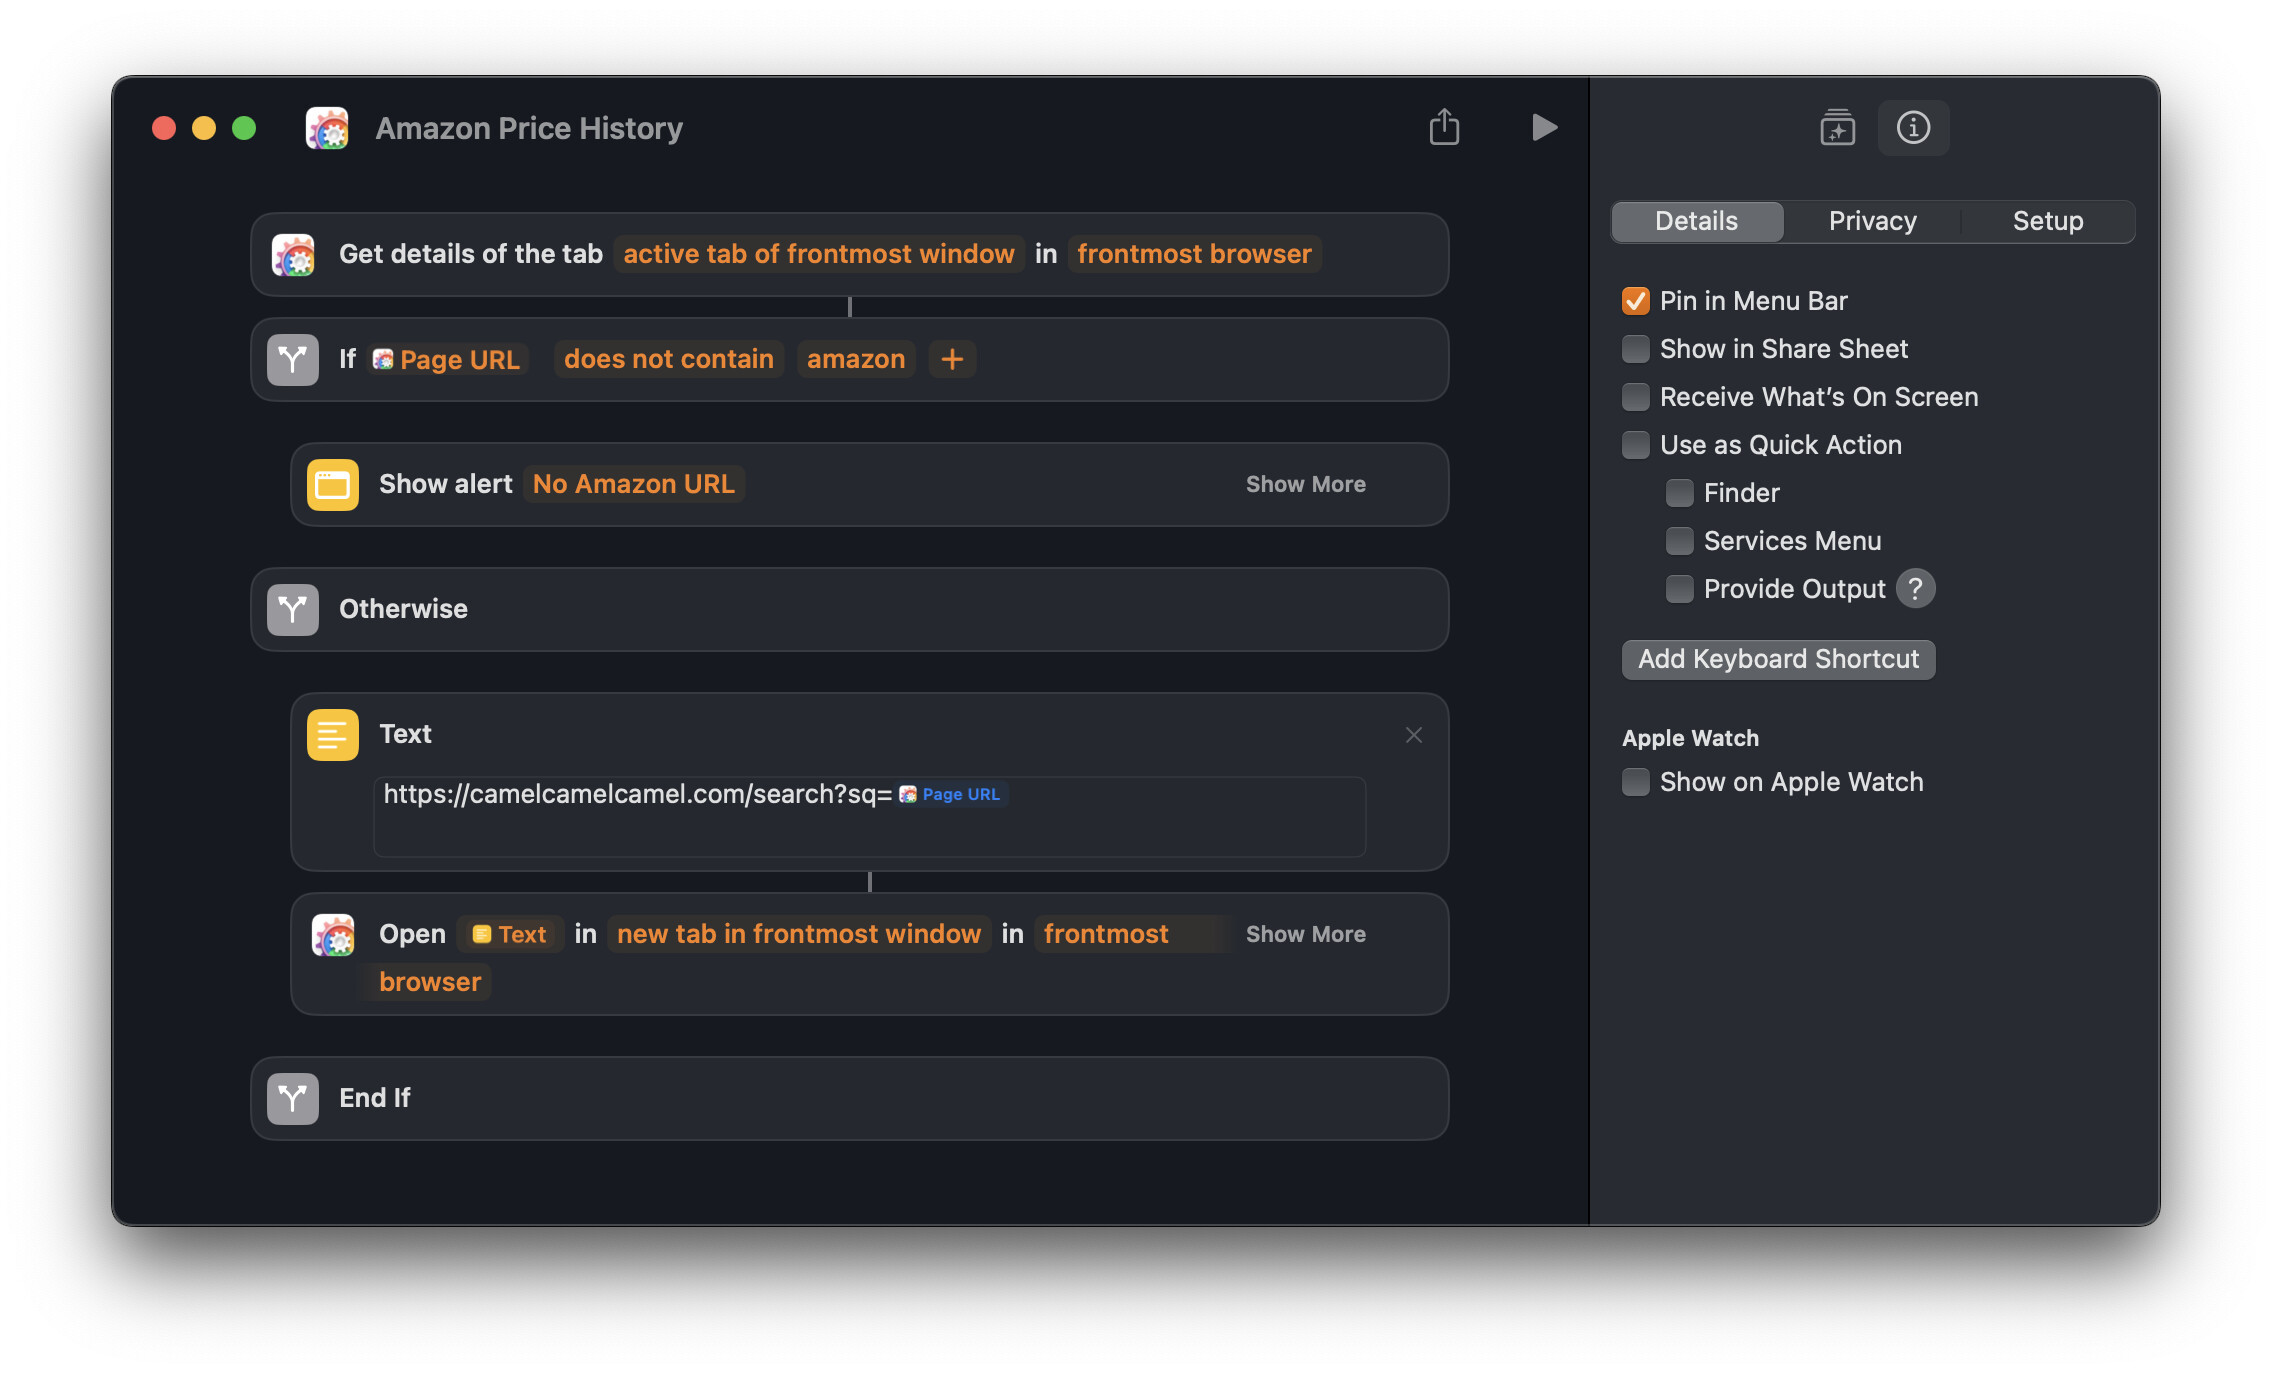
There is no need to check the option to ‘Receive What’s On Screen.’ I only use the ‘Pin in Menu Bar’ option. At this point, I also skip checking whether a URL is present
In the next step, the shortcut checks whether the ‘Page URL’ return value from the ‘Get Details of the Tab’ action contains the word ‘amazon.’
If the ‘Page URL’ is an Amazon URL, the shortcut will construct the URL in a text field, which will then be used to call CamelCamelCamel in the current browser. The result will be displayed in a new tab in this example.
This is a very basic use case for ‘Browser Actions’, but it already demonstrates an advantage over the standard actions. In the next example, I will present a slightly more complex scenario that also incorporates the use of ‘Actions for Obsidian’.
2. Save a selection from a web page along with some metadata to a specific Snippets note in an Obsidian vault.
This allows for the creation of a shortcut that takes the selection and converts it into a snippet, which will then be added to a dedicated note in your Obsidian vault, where these snippets can be collected.
This snippets page will then look like this
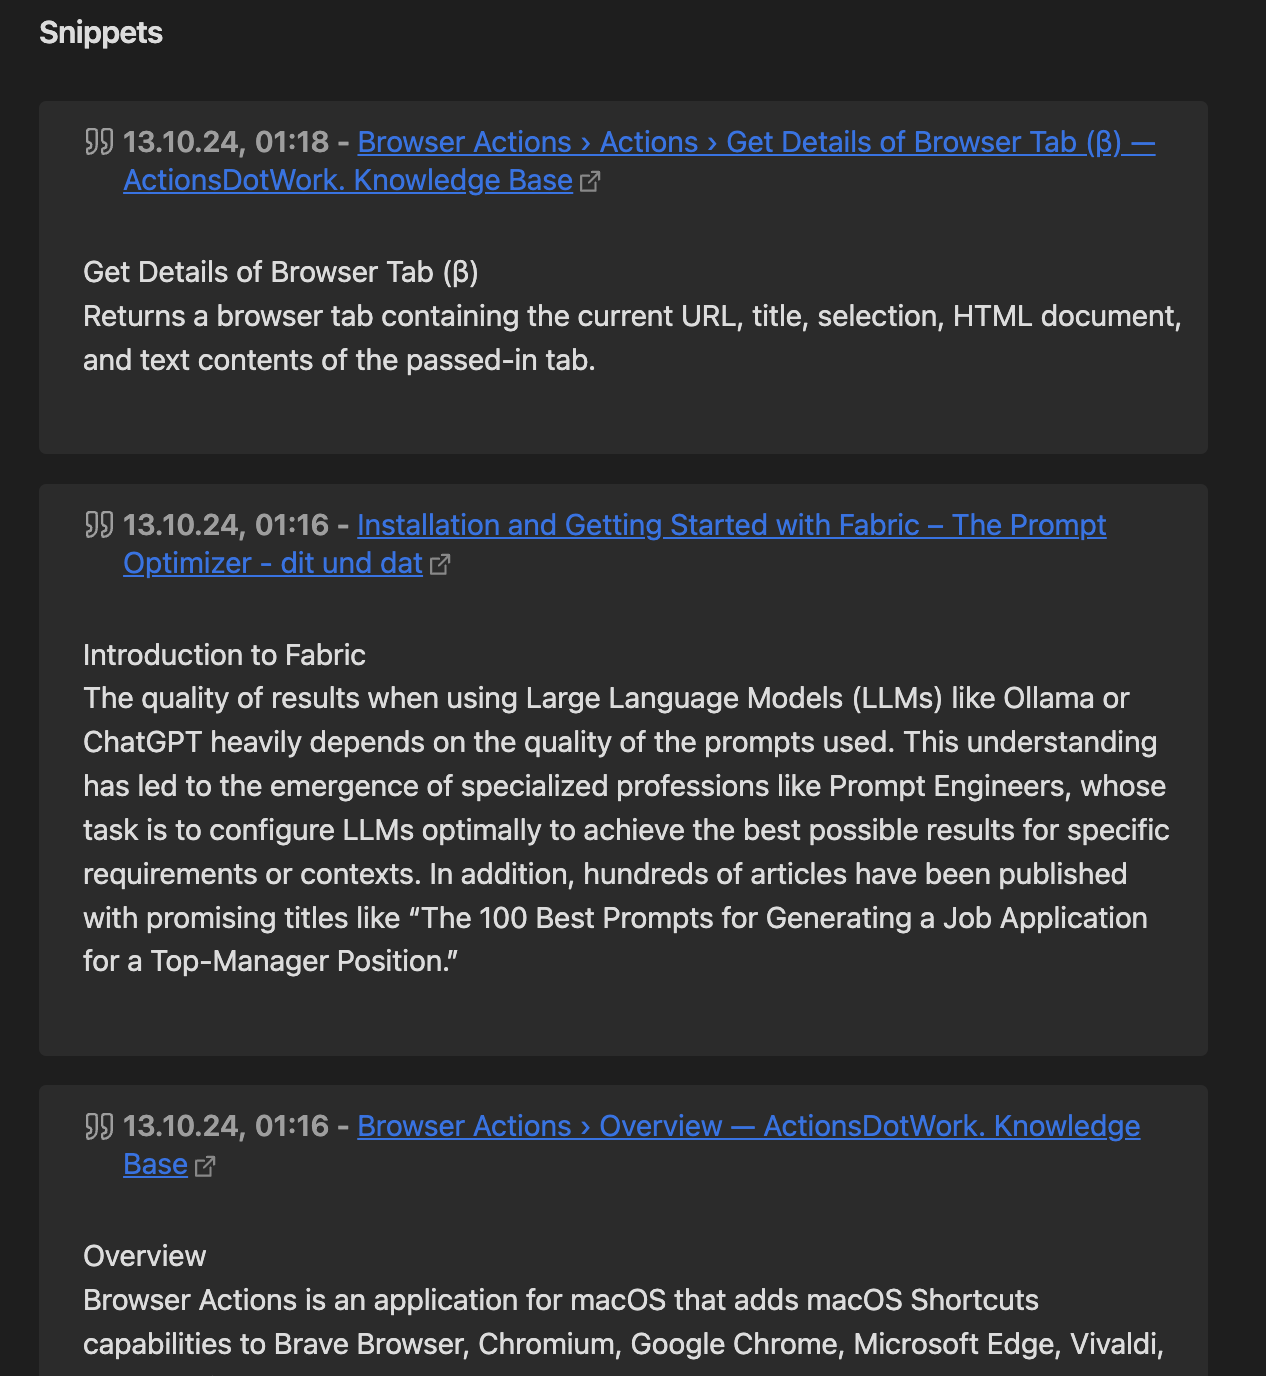
First, create a note with the headline ## Snippets and save it somewhere in your vault. Mine is currently saved in the folder ‘00 New.’ Feel free to change this according to your preferences. The snippets will be organized below the ## Snippets heading from newest to oldest. You can have other blocks defined by different headings above or below; however, the snippets will always be inserted below the ## Snippets heading.
It is also possible to sort the snippets under the heading from oldest to newest by choosing the ‘Append Notes’ action instead of ‘Prepend Notes’. However, be cautious: if you haven’t defined another heading after the ‘Snippets’ heading, the snippet will be added to the end of the note. In my case, it will be placed below my footer area, which is separated from the rest of the text only by the horizontal divider ---. This footer is not recognized as a section for this action.
As already mentioned, this shortcut will utilize another app from Carlo to interact with Obsidian: ‘Actions for Obsidian.’ So, the entire shortcut will look like this (BTW, there are several reasons why I won’t be uploading these example shortcuts. One reason is that it’s easier to understand how it works when you build it yourself)
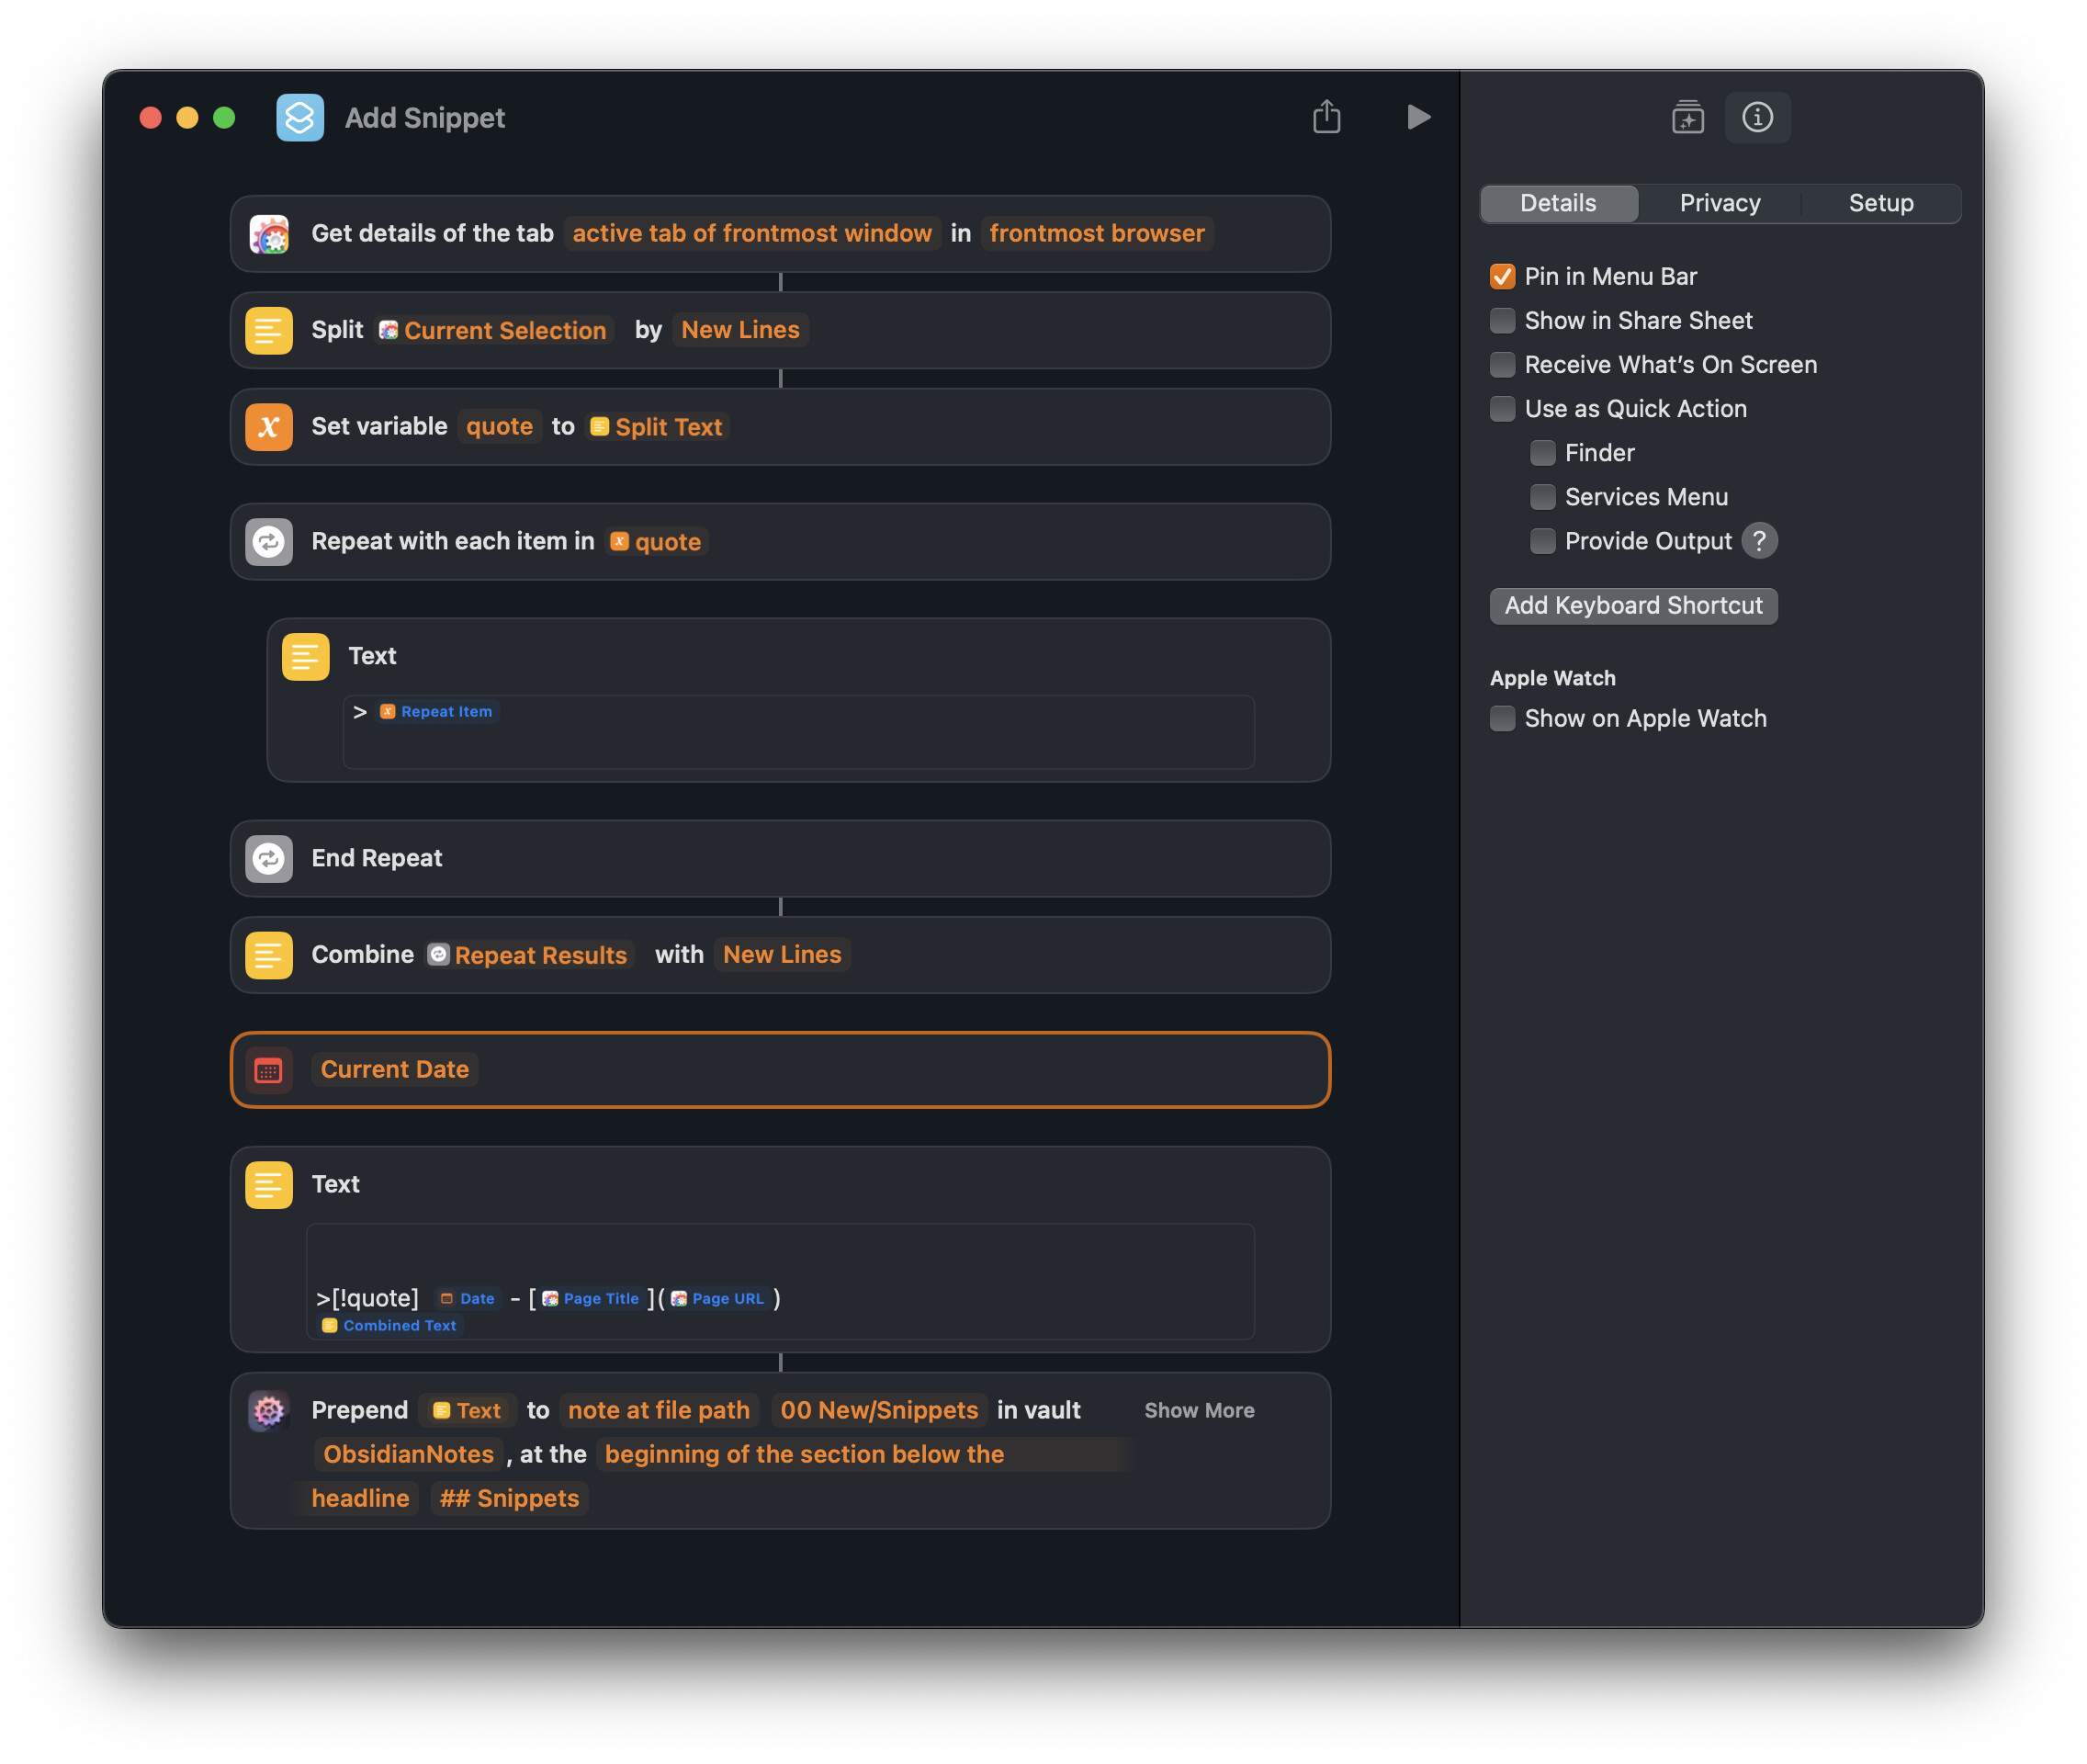
In the first step the shortcut fetch with the “Details of the tab…” action all the details of the active website, like URL, HTML, text-content, page title and so on. One of these details is the plain text of “current selection”.
Keep in mind that this shortcut does not save any visual formatting, such as headings or code blocks, nor does it include images or tables; it only stores plain text. If you want to preserve these formatting elements, you can use JavaScript to capture the selection. I have described a similar approach here: Three Styles to Save Bookmarks in Obsidian. I will soon implement and publish a corresponding solution using ‘Browser Actions’.
Maybe Carlo will also add something to copy the formatting of the selections as well (this is a feature request :-)) - already confirmed see the comment.
Since I use markdown callouts to render the boxes, each line of text must begin with a '> '. I use a little trick with the ‘Split’ action, which creates a list and converts every line of the ‘Current Selection’ into an item of that list. This list is assigned to the variable ‘quote.’ The ‘Repeat with Each’ action then processes each list item individually, adding '> ’ in front of each item. After that, the list ist re-combined into a single text.
In a text field, the callout is assembled from the components. I start with two empty lines to create some space between the blocks. The first line defines the type of callout. In this example, I use the ‘quote’ callout. This defines the Background color and the icon. As textual information I added the creation date and time, and then the page title along with the URL. In the next line, the action ‘Combine’ is used to combine the list items back into a text, whereby the list items are separated by ‘New Lines’.
To insert this snippet into the Snippets note, I use the ‘Prepend Notes’ action from ‘Actions for Obsidian’ to add the markdown callout to my ‘Snippets’ note located in the ‘00 New/Snippets’ folder, right below the heading ## Snippets.
Conclusion and Outlook
In this post I presented two small solutions that, in my view, showcase the potential that ‘Browser Actions’ offer on the Mac. In these examples, I focused on processing the content and URLs of a webpage, as this will my primary use cases. However, ‘Browser Actions’ also provides many of actions that enable the automation of interactions with internet browsers and HTML elements. I will explore this aspect further with an example HTML page in a future post, should there be interest.